
printf("ho_tari\n");
프로젝트 - AI 자율주행자동차 본문
1. 주제
딥러닝으로 학습하는 AI자율주행자동차
곡선 또는 직선 형태의 도로에서 사용자의 조작 없이도 목적지를 찾아갈 수 있다. 이 프로젝트의 핵심은 파이썬으로 코딩한 프로그램을 이용하여 진행되는 도로 주행 훈련과 학습이다. 도로 주행 학습은 자동차에 달린 카메라의 이미지 파일을 이용한다. 키보드의 방향키로 방향을 조절하면서 미리 제작한 도로를 반복적으로 주행하면서 인공지능을 학습시킬 수 있다.
AI자율주행자동차의 학습 방식은 다음과 같다.
1. 자동차에 부착된 카메라가 도로 정보를 수집한다.
2. 카메라가 촬영한 사진마다 사용자가 키보드 방향키로 조작한 기록을 수집한다.
3. 인공신경망에서 AI가 도로를 학습해 자율주행을 위한 훈련을 한다.
2. 구성
- AI자율주행자동차 몸체 부품
- 오렌지파이(오렌지파이 라이트)
- USB 카메라 모듈(기본 구성품으로 있는 카메라 대신 화질이 더 선명한 카메라로 대체함)
- 마이크로SD카드 및 리더


3. 실습 방법
1) 소프트웨어 설치 및 오렌지파이 부팅
- 마이크로SD카드에 운영체제 및 소스를 설치(Armbian이라는 OS 사용)
- Armbian 운영체제 활용(무선 인터넷 연결)
- VNC Viewer 프로그램 이용하여 원격접속(Armbian 터미널에서 ‘ifconfig’ 명령어 입력 후 IP주소 확인)


2) 인공지능 훈련 및 자율주행
- 학습데이터 수집
1. Armbian 터미널에서 ‘cd /home/orangepi/autonomousCar/lesson4’ 명령어를 입력 후 인공지능 훈련을 위한 소스들이 들어있는 폴더로 들어간다.
2. ‘sudo python3 keyboard.py’ 명령어를 입력 후 키보드 방향키를 조작하여 도로를 주행한다.
(s: 운전/정지, r: 훈련데이터 수집/종료, 왼쪽방향키: 좌회전, 오른쪽방향키: 우회전, 위 방향키: 직진, q: 프로그램 종료, 아래방향키는 작동하지 않는다.)


- 학습데이터 정제
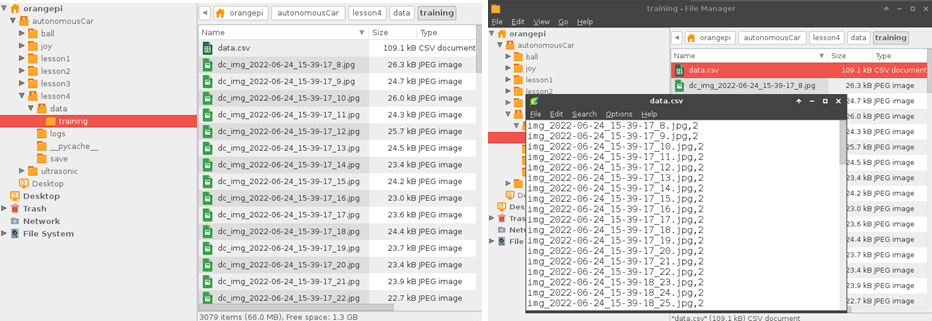
Armbian Applications -> File Manager -> /home/orangepi/autonomousCar/lesson4/data/training 순으로 들어가면 도로를 주행하면서 촬영된 이미지 파일들과 data.csv 파일들이 저장되어 있다.
- 데이터 분석 및 데이터 분포 조정
1. ‘sudo python3 data_analysis.py’ 명령어를 입력하여 좌회전, 우회전, 직진 및 정지 데이터의 수량과 비율을 확인한다.
2. ‘sudo python3 decalcom.py’ 명령어를 입력하여 도로의 이미지와 그 때의 방향키 값을 반전시킨 데이터를 생성한다.
3. ‘sudo python3 data_analysis.py’ 명령어를 통해서 좌회전, 우회전, 직진 및 정지 데이터의 수량과 비율을 다시 확인한다. 이 때 좌회전과 우회전의 데이터 값이 같게 나오는지 확인한다.


- 인공지능 훈련
‘sudo python3 train.py’ 명령어를 입력하여 인공지능이 학습을 하도록 한다.

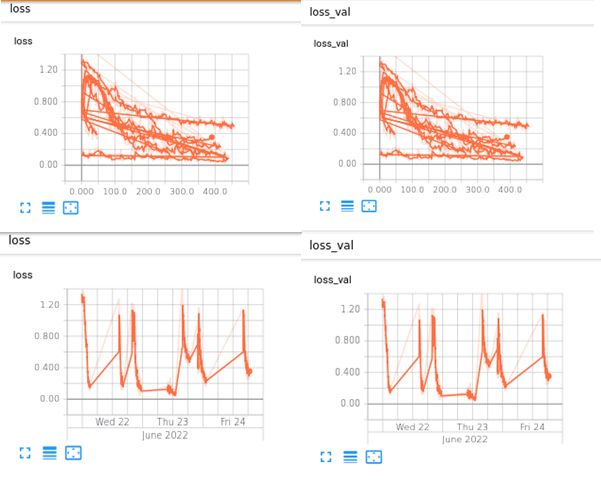
- 인공지능의 훈련 상태 관찰
‘tensorboard --logdir=./logs –port=6006’ 명령어를 입력하여 Tensorboard를 실행해 Training Loss그래프를 확인한다.
- 인공지능 훈련 검증
‘python3 simulate.py’ 명령어를 입력하여 훈련데이터의 방향 값과 인공지능이 예측한 방향 값을 비교하며 도로주행을 시뮬레이션 해본다.

- 인공지능 자율주행 테스트
‘sudo python3 airun.py’ 명령어를 입력한 후 자동차를 도로 시작점에 놓고 키보드 a키를 눌러 인공지능이 자율주행을 시작하도록 한다.

4. 파이썬 코드
<config.py>(자동차 모터 속도 조절 코드)
# -*- coding: utf-8 -*-
# Configuration
width = 320  # Video width requested from camera
height = 240  # Video height requested from camera
wheel = 0  #0:stop, 1:left, 2:strait, 3:right
recording = False
cnt = 0
outputDir = '/home/orangepi/autonomousCar/lesson4/data/'
currentDir = 'training'
# '/home/orangepi/autonomousCar/lesson4/data/training' 아래에 data.csv가 존재
file = ""
f = ''
fwriter = ''
Voicecontrol = False
AIcontrol = False
modelheight = -160 ###-130 ###-150 #-115 #-130 #-150 #-250 #-200
# training speed setting
maxturn_speed = 300
minturn_speed = 2  ###20  ###15
#좌회전 및 우회전 시에 모터의 속도 차이를 표시하는 부분(두 값의 차이가 클수록 더 많이 휜 곡선도 따라갈 수 있다.)
normal_speed_left = 30
normal_speed_right = 30
#직진 시에 좌우 모터의 속도 값
wheel_alignment_left = 0
wheel_alignment_right = 1
#자동차의 직진을 위한 바퀴 정렬 코드(직진 시 미세하게 왼쪽으로 가면 wheel_alignment_left 값을 조금 올리고 오른쪽으로 가면 wheel_alignment_right 값을 조금 올린다.)
# testing speed setting
ai_maxturn_speed = 100
ai_minturn_speed = 20
ai_normal_speed_left = 100
ai_normal_speed_right = 100
<keyboard.py>(연습 운전과 인공지능을 위한 훈련 데이터 준비)
import xhat as hw
import time
import cv2
import config as cfg
import os
import sys
import signal
import csv
def recording():
    if cfg.recording:
        cfg.recording = False
        cfg.f.close()
    else:
        cfg.recording = True
        if cfg.currentDir == '':
            cfg.currentDir = time.strftime('%Y-%m-%d')
            os.mkdir(cfg.outputDir+cfg.currentDir)
            cfg.f=open(cfg.outputDir+cfg.currentDir+'/data.csv','w')
        else:
            cfg.f=open(cfg.outputDir+cfg.currentDir+'/data.csv','a')
        cfg.fwriter = csv.writer(cfg.f)
def saveimage():
    if cfg.recording:
        myfile = 'img_'+time.strftime('%Y-%m-%d_%H-%M-%S')+'_'+str(cfg.cnt)+'.jpg'
        print(myfile, cfg.wheel)
        cfg.fwriter.writerow((myfile, cfg.wheel))
        cv2.imwrite(cfg.outputDir+cfg.currentDir+'/'+ myfile,full_image)
        cfg.cnt += 1
if __name__ == '__main__':
    start_flag = False
    c = cv2.VideoCapture(0)
    c.set(cv2.CAP_PROP_FRAME_WIDTH, 320)
    c.set(cv2.CAP_PROP_FRAME_HEIGHT, 240)
    #c.set(cv2.CAP_PROP_FPS, 15)
    while(True):
        _,full_image = c.read()
        cv2.imshow('frame',full_image)
        k = cv2.waitKey(5)
        if k == ord('q'):  # 키보드 q를 누르면 주행 코드를 종료
            break
        """ Toggle Start/Stop motor movement """
        if k == 115: # 키보드 s를 누르면 도로주행 시작. 한 번 더 누르면 정지
            if start_flag == False:
                start_flag = True
            else:
                start_flag = False
            print('start flag:',start_flag)
        """ Toggle Record On/Off  """
        if k == 114: # 키보드 r을 누르면 녹화가 시작되고 훈련 데이터를 수집
            recording()
            if cfg.recording:
               start_flag = True
            else:
               start_flag = False
               cfg.cnt = 0
            print('cfg.recording:',cfg.recording)
        #save image files and images list file
        if cfg.recording:
            saveimage()
            print(cfg.cnt)
        if start_flag:
            # 키보드 왼쪽(81), 위(82), 오른쪽(83)을 누름에 따라 바퀴 모터 조정하면서 주행할 수 있게 조작하는 코드
            if k == 81:
                hw.motor_one_speed(cfg.maxturn_speed)
                hw.motor_two_speed(cfg.minturn_speed)
                #print('Straight')
                cfg.wheel = 1
            if k == 83:
                hw.motor_one_speed(cfg.minturn_speed)
                hw.motor_two_speed(cfg.maxturn_speed)
                cfg.wheel = 3
            if k == 82:
                hw.motor_one_speed(cfg.normal_speed_right)
                hw.motor_two_speed(cfg.normal_speed_left)
                cfg.wheel = 2
        else:
            hw.motor_one_speed(0)
            hw.motor_two_speed(0)
            cfg.wheel = 0
hw.motor_clean()
cv2.destroyAllWindows()
<data_analysis.py>(좌회전, 우회전, 직진 및 정지 데이터의 수량과 비율)
import scipy.misc
import random
import csv
#from mlxtend.preprocessing import one_hot
import numpy as np
import config as cfg
xs = []
ys = []
wheel0 = 0
wheel1 = 0
wheel2 = 0
wheel3 = 0
#points to the end of the last batch
train_batch_pointer = 0
val_batch_pointer = 0
#read data.csv
with open('data/' + cfg.currentDir + '/data.csv', newline='') as csvfile:
    spamreader = csv.reader(csvfile, delimiter=',', quotechar='|')
    for row in spamreader:
        #print(row[0], row[1])
        xs.append('data/' + cfg.currentDir + '/' + row[0])
        ys.append(int(row[1]))
        if int(row[1]) == 0:
            wheel0 += 1
        elif int(row[1]) == 1:
            wheel1 += 1
        elif int(row[1]) == 2:
            wheel2 += 1
        elif int(row[1]) == 3:
            wheel3 += 1
print('Total data counts: ', len(xs))
print('Stop data counts: ', wheel0, ', ratio(%):', ' %0.1f' % (wheel0/len(xs)*100))
#자동차가 정지하는 데이터의 수량과 비율을 나타냄
print('Left data counts: ', wheel1, ', ratio(%):', ' %0.1f' % (wheel1/len(xs)*100))
#자동차가 좌회전하는 데이터의 수량과 비율을 나타냄
print('strait data counts: ', wheel2, ', ratio(%):', ' %0.1f' % (wheel2/len(xs)*100))
#자동차가 직진하는 데이터의 수량과 비율을 나타냄
print('Right data counts: ', wheel3, ', ratio(%):', ' %0.1f' % (wheel3/len(xs)*100))
#자동차가 우회전하는 데이터의 수량과 비율을 나타냄
###ys = one_hot(ys, num_labels=4, dtype='int')
#print(np.reshape(ys, -1))
#get number of images
num_images = len(xs)
#shuffle list of images
c = list(zip(xs, ys))
random.shuffle(c)
xs, ys = zip(*c)
train_xs = xs[:int(len(xs) * 0.8)]
train_ys = ys[:int(len(xs) * 0.8)]
val_xs = xs[-int(len(xs) * 0.2):]
val_ys = ys[-int(len(xs) * 0.2):]
"""
train_xs = xs[:int(len(xs) * 1)]
train_ys = ys[:int(len(xs) * 1)]
val_xs = xs[-int(len(xs) * 1):]
val_ys = ys[-int(len(xs) * 1):]
"""
num_train_images = len(train_xs)
num_val_images = len(val_xs)
def LoadTrainBatch(batch_size):
    global train_batch_pointer
    x_out = []
    y_out = []
    for i in range(0, batch_size):
        x_out.append(scipy.misc.imresize(scipy.misc.imread(train_xs[(train_batch_pointer+i)% num_train_images])[cfg.modelheight:], [66, 200]) / 255.0)
        y_out.append([train_ys[(train_batch_pointer + i) % num_train_images]])
    train_batch_pointer += batch_size
    return x_out, y_out
def LoadValBatch(batch_size):
    global val_batch_pointer
    x_out = []
    y_out = []
    for i in range(0, batch_size):
        x_out.append(scipy.misc.imresize(scipy.misc.imread(val_xs[(val_batch_pointer+i)% num_val_images])[cfg.modelheight:], [66, 200]) / 255.0)
        y_out.append([val_ys[(val_batch_pointer + i) % num_val_images]])
    val_batch_pointer += batch_size
    return x_out, y_out
<airun.py>(인공지능 자율 주행 실행)
import xhat as hw
import time
import cv2
import config as cfg
#import opidistance3 as dc
import tensorflow as tf
import scipy.misc
import numpy as np
import model
import os
import sys
import signal
import csv
if __name__ == '__main__':
    sess = tf.InteractiveSession()
    saver = tf.train.Saver()
    saver.restore(sess, "save/model.ckpt")
    start_flag = False
    #testing speed variation
    speed_change_flag = False
    if speed_change_flag:
        cfg.maxturn_speed = cfg.ai_maxturn_speed
        cfg.minturn_speed = cfg.ai_minturn_speed
        cfg.normal_speed_left = cfg.ai_normal_speed_left
        cfg.normal_speed_right = cfg.ai_normal_speed_right
    c = cv2.VideoCapture(0)
    c.set(cv2.CAP_PROP_FRAME_WIDTH, 320)
    c.set(cv2.CAP_PROP_FRAME_HEIGHT, 240)
    #c.set(cv2.CAP_PROP_FPS, 15)
    while(True):
        _,full_image = c.read()
        #full_image = cv2.resize(full_image, (320,240))
        image = scipy.misc.imresize(full_image[cfg.modelheight:], [66, 200]) / 255.0
        image1 = scipy.misc.imresize(full_image[cfg.modelheight:], [66*2, 200*2])
        #cv2.imshow('original',full_image)
        #cv2.imshow("view of AI", cv2.cvtColor(image1, cv2.COLOR_RGB2BGR))
        cv2.imshow("view of AI", image1)
        wheel = model.y.eval(session=sess,feed_dict={model.x: [image], model.keep_prob: 1.0})
        cfg.wheel = np.argmax(wheel, axis=1)
        #print('wheel value:', cfg.wheel, wheel)
        print('wheel value:', cfg.wheel, model.softmax(wheel))
        k = cv2.waitKey(5)
        if k == ord('q'):  #'q' key to stop program
            break
        """ Toggle Start/Stop motor movement """
        if k == ord('a'):
            if start_flag == False:
                start_flag = True
            else:
                start_flag = False
            print('start flag:',start_flag)
        #to avoid collision when ultrasonic sensor is available
        length = 30 #dc.get_distance()
        if  5 < length and length < 15 and start_flag:
            hw.motor_one_speed(0)
            hw.motor_two_speed(0)
            print('Stop to avoid collision')
            time.sleep(0.5)
            continue
        if start_flag:
            if cfg.wheel == 0:
                hw.motor_two_speed(0)
                hw.motor_one_speed(0)
            if cfg.wheel == 1:   #left turn
                hw.motor_two_speed(cfg.minturn_speed)
                hw.motor_one_speed(cfg.maxturn_speed)
            if cfg.wheel == 2:
                hw.motor_two_speed(cfg.normal_speed_left)
                hw.motor_one_speed(cfg.normal_speed_right)
            if cfg.wheel == 3:   #right turn
                hw.motor_two_speed(cfg.maxturn_speed)
                hw.motor_one_speed(cfg.minturn_speed)
        else:
            hw.motor_one_speed(0)
            hw.motor_two_speed(0)
            cfg.wheel = 0
hw.motor_clean()
cv2.destroyAllWindows()
<decalcom.py>(도로의 이미지와 그 때의 방향키 값을 반전시킨 데이터 생성)
import scipy.misc
import cv2
import random
import csv
#from mlxtend.preprocessing import one_hot
import numpy as np
import config as cfg
#delete dc_img* in data.csv file
originalrows = []
with open('data/' + cfg.currentDir + '/data.csv', newline='') as csvfile:
    filereader = csv.reader(csvfile, delimiter=',', quotechar='|')
    for row in filereader:
        #print(row[0], row[1])
        if row[0][:2] != 'dc':
            originalrows.append(row)
with open('data/' + cfg.currentDir + '/data.csv', 'w') as csvfile:
    filewriter = csv.writer(csvfile, delimiter=',', quotechar='|')
    filewriter.writerows(originalrows)
x1 = []
#y1 = []
x2 = []
x3 = []
#y3 = []
#read data.csv
with open('data/' + cfg.currentDir + '/data.csv', newline='') as csvfile:
    filereader = csv.reader(csvfile, delimiter=',', quotechar='|')
    for row in filereader:
        #print(row[0], row[1])
        if int(row[1]) == 1:
            x1.append(row[0])
        elif int(row[1]) == 2:
            x2.append(row[0])
        elif int(row[1]) == 3:
            x3.append(row[0])
cfg.f=open(cfg.outputDir+cfg.currentDir+'/data.csv','a')
cfg.fwriter = csv.writer(cfg.f)
for i in range(len(x1)):
    full_image = cv2.imread('data/' + cfg.currentDir + '/' + x1[i] , cv2.IMREAD_COLOR)
    full_image = cv2.flip(full_image, 1)
    myfile = 'data/' + cfg.currentDir + '/dc_' + x1[i]
    cv2.imwrite(myfile,full_image)
    cfg.fwriter.writerow(('dc_' + x1[i], 3))
for i in range(len(x3)):
    full_image = cv2.imread('data/' + cfg.currentDir + '/' + x3[i] , cv2.IMREAD_COLOR)
    full_image = cv2.flip(full_image, 1)
    myfile = 'data/' + cfg.currentDir + '/dc_' + x3[i]
    cv2.imwrite(myfile,full_image)
    cfg.fwriter.writerow(('dc_' + x3[i], 1))
for i in range(len(x2)):
    full_image = cv2.imread('data/' + cfg.currentDir + '/' + x2[i] , cv2.IMREAD_COLOR)
    full_image = cv2.flip(full_image, 1)
    myfile = 'data/' + cfg.currentDir + '/dc_' + x2[i]
    cv2.imwrite(myfile,full_image)
    cfg.fwriter.writerow(('dc_' + x2[i], 2))
<simulate.py>(실제 자율주행을 시켰을 때 어떻게 움직일지를 시뮬레이션)
import tensorflow as tf
import scipy.misc
import model
import cv2
from subprocess import call
import time
import csv
import numpy as np
import config as cfg
sess = tf.InteractiveSession()
saver = tf.train.Saver()
saver.restore(sess, "save/model.ckpt")
xs = []
ys = []
with open(cfg.outputDir+cfg.currentDir+'/data.csv', newline='') as csvfile:
    spamreader = csv.reader(csvfile, delimiter=',', quotechar='|')
    for row in spamreader:
        #print(row[0], row[1])
        xs.append(row[0])
        ys.append(row[1])
print(xs[0])
i = 0
correct_num = 0
while(cv2.waitKey(10) != ord('q')):
    full_image = scipy.misc.imread('data/' + cfg.currentDir + '/' + xs[i] , mode="RGB")
    image = scipy.misc.imresize(full_image[cfg.modelheight:], [66, 200]) / 255.0
    image1 = scipy.misc.imresize(full_image[cfg.modelheight:], [66*3, 200*3])
    degrees = model.y.eval(feed_dict={model.x: [image], model.keep_prob: 1.0})
    ###print("Label y: " + ys[i], 'prediced value:', np.argmax(degrees, axis=1),degrees)
    print("Label y: " + ys[i], 'prediced value:', np.argmax(degrees, axis=1))
    cv2.imshow("Feed", cv2.cvtColor(image1, cv2.COLOR_RGB2BGR))
    cv2.imshow("Original", cv2.cvtColor(full_image, cv2.COLOR_RGB2BGR))
    if int(ys[i]) == np.argmax(degrees, axis=1):
        correct_num += 1
    i += 1
    print('i:', i, 'correct_num: ', correct_num, 'percentage: ', correct_num/(i) * 100)
cv2.destroyAllWindows()
<train.py>(인공지능 학습 코드)
import os
import tensorflow as tf
from tensorflow.core.protobuf import saver_pb2
import driving_data
import model
import numpy as np
import time
begin = time.strftime('%Y-%m-%d_%H-%M-%S')
LOGDIR = './save'
tf.logging.set_verbosity(tf.logging.ERROR)
sess = tf.InteractiveSession()
L2NormConst = 0.001
train_vars = tf.trainable_variables()
start_learning_rate = 0.5e-3    ###1e-3
adjust_learning_rate = 1e-5
onehot_labels = tf.one_hot(indices=tf.reshape(tf.cast(model.y_, tf.int32),[-1]), depth=4)
loss = tf.losses.softmax_cross_entropy( onehot_labels=onehot_labels, logits=model.y)
#loss = tf.nn.softmax_cross_entropy_with_logits_v2( labels=onehot_labels, logits=model.y)
train_step = tf.train.AdamOptimizer(start_learning_rate).minimize(loss)
loss_val = tf.losses.softmax_cross_entropy( onehot_labels=onehot_labels, logits=model.y)
#loss_val = tf.nn.softmax_cross_entropy_with_logits_v2( labels=onehot_labels, logits=model.y)
#train_step = tf.train.AdamOptimizer(start_learning_rate).minimize(loss)
###sess.run(tf.initialize_all_variables())
sess.run(tf.global_variables_initializer())
# create a summary to monitor cost tensor
###tf.scalar_summary("loss", loss)
tf.summary.scalar("loss", loss)
tf.summary.scalar("loss_val", loss_val)
# merge all summaries into a single op
###merged_summary_op = tf.merge_all_summaries()
merged_summary_op = tf.summary.merge_all()
saver = tf.train.Saver(write_version = tf.train.SaverDef.V2)
saver.restore(sess, "save/model.ckpt")
# saver.restore 함수를 사용하여 이전 모델을 불러들이고 추가로 훈련을 시킴.
# op to write logs to Tensorboard
logs_path = './logs'
summary_writer = tf.summary.FileWriter(logs_path, graph=tf.get_default_graph())
epochs = 13   ###8  ###12  ###20
batch_size = 100
# train over the dataset about 30 times
for epoch in range(epochs):
  for i in range(int(driving_data.num_images/batch_size)):
    xs, ys = driving_data.LoadTrainBatch(batch_size)
    ###train_step.run(feed_dict={model.x: xs, model.y_: ys, model.keep_prob: 0.8})
    train_step.run(feed_dict={model.x: xs, model.y_: ys, model.keep_prob: 0.7})
    loss_value = loss.eval(feed_dict={model.x: xs, model.y_: ys, model.keep_prob: 1.0})
    #print("Epoch: %d, Step: %d, Loss: %g" % (epoch, epoch * batch_size + i, loss_value))
    print("Epoch: %d, Step: %d, Loss: %g" % (epoch, i, loss_value))
    if i % 10 == 0:
      xs_val, ys_val = driving_data.LoadValBatch(batch_size)
      ###xs, ys = driving_data.LoadTrainBatch(batch_size)
      loss_val = loss.eval(feed_dict={model.x:xs_val, model.y_: ys_val, model.keep_prob: 1.0})
      print("Epoch: %d, Step: %d, Loss_val: %g" % (epoch, i, loss_val))
    # write logs at every iteration
    summary = merged_summary_op.eval(feed_dict={model.x:xs, model.y_: ys, model.keep_prob: 1.0})
    summary_writer.add_summary(summary, epoch * driving_data.num_images/batch_size + i)
    if i % batch_size == 0:
      if not os.path.exists(LOGDIR):
        os.makedirs(LOGDIR)
      checkpoint_path = os.path.join(LOGDIR, "model.ckpt")
      filename = saver.save(sess, checkpoint_path)
      print("Model saved in file: %s" % filename)
correct_prediction = tf.equal(tf.argmax(onehot_labels, 1), tf.argmax(model.y, 1))
accuracy = tf.reduce_mean(tf.cast(correct_prediction, tf.float32))
print('Train Accuracy:', sess.run(accuracy, feed_dict={model.x: xs, model.y_: ys, model.keep_prob: 1.0}))
print('Validation Accuracy:', sess.run(accuracy, feed_dict={model.x: xs_val, model.y_: ys_val, model.keep_prob: 1.0}))
end = time.strftime('%Y-%m-%d_%H-%M-%S')
print('begin: ', begin)
print('end: ', end)
print("Run the command line:\n" \
          "--> tensorboard --logdir=./logs --port=6006" \
          "\nThen open http://0.0.0.0:6006/ into your web browser")
#os.system("sudo -s shutdown -h now")
5. 고찰
인공지능 훈련을 위한 반복 학습이 필요하여 간단하지 않은 프로젝트였다. 전반적으로 노력과 시간이 많이 소요되는 프로젝트로 쉽지 않았다. 프로젝트를 진행하면서 가장 힘들었던 점은 도로 주행 학습데이터를 수집한 뒤 인공지능 훈련을 위해 진행시키는 프로그램이 소요 시간이 너무 길다는 점이다. 프로그램이 한 번 돌아가는데 대략 3-4시간 이상 걸리기 때문에 하루에 자율주행을 시도할 수 있는 기회가 제한적이었다. 하지만 초반에 계속해서 실패를 하였고 이를 통해 자율주행을 성공시키기 위해서는 다양한 조건들이 필요하다는 것을 알게 되었다. 그 조건들로는 학습 데이터의 양을 많이 늘려주더라도 그 데이터들이 정확하지 않으면 오히려 과잉학습이 되어 결과가 좋지 않을 수도 있다는 것, 도로 주행을 선명하고 깔끔하게 촬영할 수 있는 카메라와 카메라가 촬영하는 도로의 깔끔한 상태, 이러한 도로를 범위 안에서 잘 운전시키는 조종 능력 등이 있다. 이런 조건들을 하나씩 조정하면서 마지막에 성공을 시켜 뿌듯함과 성취감을 느낄 수 있었다.